
Growing autoflowering cannabis offers an accessible entry point for both novice and seasoned growers. These plants are famous for their quick, easy growing cycle and the fact that they don’t require changes in light exposure to begin flowering. Learning how to grow autoflowers from germination to harvest involves understanding the plant’s life stages and providing the right care at the right time.
In this comprehensive week-by-week guide, we’ll cover the essential stages of autoflower growth, from germination through to harvest. By following this guide, you’ll know what to expect, how to care for your plants, and what common mistakes to avoid.
Contents
What You Need to Know About Autoflowers
Before you begin, it’s essential to understand what makes autoflowering cannabis different from traditional photoperiod strains. Autoflowers have a faster life cycle, often completing their growth from seed to harvest in as little as 8-10 weeks. They are also unique because they flower based on age rather than changes in the light cycle, which gives you more flexibility with your lighting schedule.
Key Benefits of Growing Autoflowers:
– Fast Growing: Autoflowers are often ready to harvest in under 10 weeks.
– Compact Size: They tend to be smaller, making them ideal for indoor or small-space growing.
– Resistant to Light Stress: Since they flower independently of the light cycle, they are more forgiving with lighting changes.
– Beginner-Friendly: Their speed, resilience, and simplicity make autoflowers a great option for beginner growers.
Challenges of Growing Autoflowers:
– No Recovery from Stress: Autoflowers have a short life cycle, meaning any stress (like overwatering or improper training) can significantly impact yield.
– Limited Training: While low-stress training (LST) is possible, high-stress training techniques like topping should generally be avoided since autoflowers don’t have time to recover.
Light Schedule for Autoflowering Strains
Autoflowering strains, as their name implies, do not need a change in the light cycle to initiate the flowering phase. Many growers opt for a consistent light schedule of 18 hours of light and 6 hours of darkness throughout the entire growth cycle. Some cultivators, however, prefer to keep the lights on continuously to maximize photosynthesis and accelerate growth. While this approach can lead to faster development, it may also significantly increase electricity costs.
This distinctive characteristic of autoflowers allows outdoor growers to achieve multiple harvests within a single growing season. By germinating seeds weekly during early spring, you can expect your first harvest in approximately eight weeks. Following this, you can continue to reap rewards with subsequent weekly harvests, especially when cultivating fast-growing strains.
Week 1: Germination and Seedling Stage

How the Plant Looks
In the first week, you’ll notice the seedling emerge with two small leaves called cotyledons. The plant is extremely small and fragile, typically no more than an inch tall. The roots are developing underground, though you won’t see significant growth above the surface yet.
Key Growth Stages
The key development in this stage is germination. This can take anywhere from 1-5 days, depending on factors like temperature and moisture levels. After the seed cracks open, the seedling will sprout and begin its life cycle.
Plant Care
– Humidity: The seedling stage requires a high humidity environment, ideally between 70-80%. If you’re growing indoors, use a humidity dome or small grow tent to trap moisture.
– Temperature: Keep temperatures around 20-25°C (68-77°F) to encourage germination and early root development.
– Lighting: Use a gentle LED light or fluorescent light at a distance of 24-36 inches. Seedlings are delicate, and too much light can scorch them.
– Watering: Use a spray bottle to mist the soil lightly. Overwatering is a common mistake at this stage. The soil should be moist but never waterlogged. You want to encourage the roots to seek water, promoting stronger root growth.
Nutrient Needs
At this stage, the seedling does not need additional nutrients. The seed itself contains enough energy to sustain the plant for its first few days of growth.
Watch Out For
– Damping Off: A fungal condition caused by excessive moisture, damping off can kill seedlings rapidly. Ensure adequate airflow and avoid overwatering.
– Stretching: If your seedlings grow tall and spindly, they may not be getting enough light. Move your light closer if you notice excessive stretching.
Common Mistakes to Avoid
– Avoid Overwatering: This is one of the most common beginner mistakes. Too much water can drown the roots and encourage fungal growth.
– Do Not Apply Nutrients: Adding nutrients too early can burn the delicate roots of your seedling.
Week 2-3: End of Seedling Stage & Start of Vegetative Stage

How the Plant Looks
By the second week, the plant will be developing its first true set of leaves, typically featuring three to five blades. By the third week, the leaves will become larger and the plant will start to resemble a small cannabis plant rather than a seedling. You’ll also notice more vertical growth and possibly the start of branch development.
Key Growth Stages
The seedling stage is coming to an end, and the plant will start shifting its energy towards vegetative growth. Root development is still a priority, but you’ll start seeing the plant expand upwards and outwards, forming a sturdier stem and more defined leaves.
Plant Care
– Light: At this point, the plant will need stronger light to fuel its vegetative growth. You can move the light closer to 18-24 inches from the plant. Autoflowers generally thrive under 18-24 hours of light daily.
– Watering: Increase the frequency slightly, but be mindful of the plant’s needs. Water the plant when the top inch of the soil feels dry.
– Air Circulation: Adequate airflow is essential to prevent mold and strengthen the plant’s stem.
Nutrient Needs
During weeks 2-3, it’s safe to start introducing a mild nutrient solution, particularly one that is high in nitrogen. Start with a ¼ strength nutrient mix to avoid overwhelming the plant. Look for vegetative stage nutrients that promote root development and leafy growth.
Watch Out For
– Nutrient Deficiency: As the plant transitions to the vegetative stage, you may start seeing signs of nutrient deficiency (e.g., yellowing leaves). This could indicate a lack of nitrogen, which is crucial for vegetative growth.
Common Mistakes to Avoid
– Don’t Overfeed: Start slow with nutrients. Too much too soon can lead to nutrient burn.
– Don’t Stress the Plant: Avoid any high-stress training techniques, as autoflowers are sensitive and might not recover.
Week 3-4: Vegetative Stage

How the Plant Looks
By now, your plant should have a healthy set of leaves and a thickening stem. Lateral branches will begin to develop, and the plant will start to look bushier. The height will increase, though autoflowering cannabis plants typically stay compact.
Key Growth Stages
This is the core vegetative stage, where the plant focuses on growing foliage and strengthening its structure in preparation for the flowering phase. You’ll see new leaves appear rapidly, and the plant may grow several inches taller.
Plant Care
– Light: Maintain a consistent light schedule. Autoflowers can handle 18-24 hours of light, but make sure your plant is not getting stressed from excessive heat.
– Training: If you want to maximize yield, this is a good time to start low-stress training (LST). Gently bend the branches and tie them down to increase light exposure to lower parts of the plant.
– Watering: The plant will require more water now, but always allow the top layer of soil to dry before watering again to avoid root rot.
Nutrient Needs
Increase the nutrient strength slightly (to about ½ strength) and focus on nitrogen-rich fertilizers. If your plant shows signs of deficiency, you may need to supplement with additional nutrients.
Watch Out For
– Signs of Pests: Check your plant regularly for pests like spider mites or aphids, which can attack at this stage.
Common Mistakes to Avoid
– Avoid Overwatering: Let the roots breathe by allowing the soil to dry slightly between waterings.
– Don’t Overdo Training: Stick to low-stress methods to avoid stunting your plant’s growth.
Week 4-5: Late Vegetative Stage

How the Plant Looks
By weeks 4 and 5, the plant should be noticeably bigger, with a stronger stem and more developed branches. Leaves will likely be broad, dark green, and plentiful. The plant will also show clear signs of branching, and you may notice pre-flowers starting to develop at the nodes (the points where the leaves meet the stem). These pre-flowers are a sign that your autoflowering cannabis plant is preparing to transition into the flowering stage.
Key Growth Stages
During this stage, the plant is still growing rapidly. It’s focusing on building its structure to support the heavy buds that will develop during the flowering stage. The height and bushiness of the plant may increase substantially during these weeks. This is the last stage of major vegetative growth before the plant fully transitions to flowering.
Plant Care
– Light: Continue providing 18-24 hours of light per day. The plant will need plenty of light during this stage to fuel its growth.
– Training: If you haven’t started low-stress training (LST) yet, this is the last chance to do so before the plant enters full flowering mode. Gently bend and tie down branches to create an even canopy, allowing light to penetrate lower bud sites.
– Watering: Water as needed, ensuring the soil doesn’t stay too wet for long periods. By now, your plant should be drinking more, so monitor the soil moisture closely.
– Air Circulation: Ensure good airflow around the plant. This will help strengthen the stems and prevent mold, especially as the plant starts to develop flowers.
Nutrient Needs
In the late vegetative stage, it’s important to feed your plant with a balanced nutrient mix that is still high in nitrogen but also includes phosphorus and potassium. These nutrients will support healthy root development and prepare the plant for the flowering phase. A mix of ½ to ¾ strength is ideal at this stage, depending on how the plant is responding.
Watch Out For
– Nutrient Deficiency: Watch for signs of deficiency in the leaves, such as yellowing or spotting, which may indicate a need for more nitrogen or other essential nutrients. You want to avoid nutrient burn, so make sure you are not overfeeding your plants with nutrients.
– Height management: Autoflowers can grow fast, so monitor their height and adjust the light source accordingly to prevent light burn or excessive stretching.
Common Mistakes to Avoid
– Avoid Overfeeding: Be cautious about increasing nutrient doses too quickly. Sudden changes can shock the plant and lead to nutrient burn.
– Avoid Pruning: By this stage, avoid any high-stress activities like pruning or excessive defoliation, as the plant is about to flower, and any stress could reduce your yield.
Week 5-6: Early Flowering Stage
How the Plant Looks
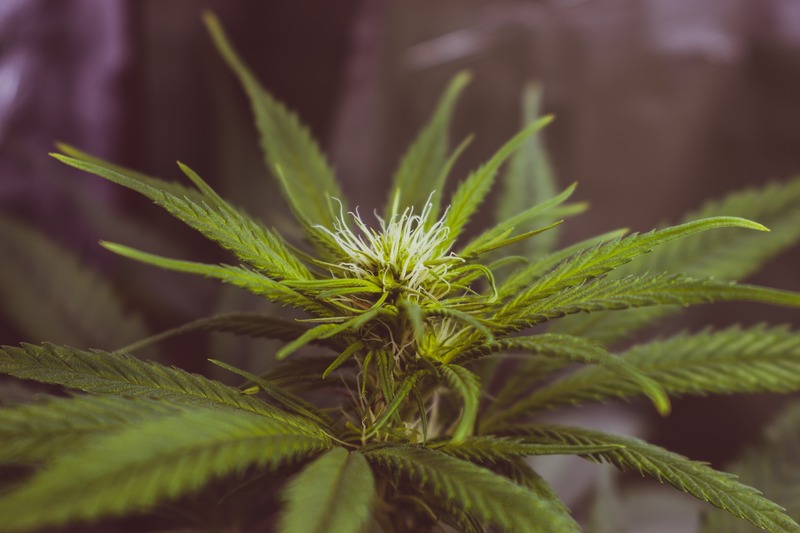
Your autoflowering cannabis plant will now begin to develop visible buds. The plant may stretch in height during this time as it focuses on preparing for bud production. White pistils (hairs) will emerge from the nodes, and the plant’s overall structure will become more defined. The leaves may start to thin out as energy shifts from leaf production to flower development.
Key Growth Stages
In the early flowering stage, the plant shifts its energy towards developing buds. The white pistils are the first sign of this process, and over the next few weeks, these will develop into thick, resinous buds. You may also notice the plant stretching slightly taller during this phase. This is called the “flowering stretch,” and it’s common for autoflowers to grow quickly during this period.
Plant Care
– Light: Continue providing 18-24 hours of light. Autoflowers don’t need a change in light schedule to start flowering, but more light can help with bigger yields.
– Humidity: Decrease the humidity levels to around 50-60% to prevent mold and mildew as the flowers develop.
– Watering: Be consistent with your watering schedule. The plant will need more water now, especially as it stretches. However, ensure proper drainage to avoid waterlogged roots.
– Training: Stop all forms of training at this point. Any additional stress could reduce your final yield.
Nutrient Needs
Switch to a bloom nutrient mix that is higher in phosphorus and potassium and lower in nitrogen. Phosphorus and potassium are essential for bud development, while too much nitrogen can delay flowering. Start with ½ strength and increase as needed.
Watch Out For
– Pests and Mold: With the plant entering the flowering phase, it’s more susceptible to mold and pests. Check your buds regularly to ensure they’re healthy and free of mold, mildew, or infestations.
Common Mistakes to Avoid
– Avoid Overfeeding: Transition slowly to flowering nutrients. Sudden changes can lead to nutrient imbalances or toxicity.
Week 6-7: Flowering Stage

How the Plant Looks
By now, the plant should be full of developing buds. The white pistils will still be visible, but the buds will start to swell, becoming denser and more aromatic. Trichomes, the tiny, sticky resin glands, will begin to cover the buds and surrounding leaves. The plant will likely stop stretching and focus on building bud mass.
Key Growth Stages
In this stage, the buds grow bigger and start to fill out. Trichomes, which contain the plant’s cannabinoids (such as THC and CBD), will become more prominent, giving the buds a frosty appearance. The scent of the plant will also intensify during this phase as terpenes (the compounds responsible for cannabis aroma) become more concentrated.
Plant Care
– Light: Keep your light schedule consistent. Autoflowers will continue to benefit from 18-24 hours of light daily to encourage maximum bud growth.
– Humidity: Lower the humidity to around 40-50% to prevent mold and mildew from forming on the buds.
– Air Circulation: Ensure adequate air movement to keep humidity down and prevent mold. Use fans if necessary to keep the air circulating.
– Watering: The plant will still need plenty of water, but avoid letting the soil stay too wet for too long. Good drainage is crucial.
Nutrient Needs
Focus on bloom nutrients, rich in phosphorus and potassium. At this stage, the plant needs a steady supply of these nutrients to fuel bud growth. You may also want to add supplements like molasses or a carbohydrate booster to help the plant develop more resin.
Watch Out For
– Bud Rot: Bud rot is a common issue during the flowering stage, especially in environments with high humidity. It can destroy your harvest, so watch for any signs of mold or rot in the buds.
– Nutrient Burn: As you transition into bloom nutrients, be mindful not to overfeed your plant. Yellowing tips or burnt edges on leaves are early signs of nutrient burn.
Common Mistakes to Avoid
– Don’t Touch the Buds: Trichomes are delicate, and handling the buds too much can damage them and reduce the overall potency.
– Avoid Overfeeding: Stick to the recommended nutrient levels and avoid giving the plant more than it can handle.
Week 8-9: Late Flowering Stage

How the Plant Looks
By week 8 or 9, your autoflowering plant will be approaching harvest time. The buds will be thick, dense, and covered in trichomes. The white pistils will begin to darken and curl inward, and the buds will emit a strong, pungent aroma. The leaves may start to yellow as the plant directs all its energy into finishing the buds.
Key Growth Stages
In the final weeks, the buds will reach their full size and potency. Trichomes will start to turn from clear to cloudy, and eventually to amber, which is a sign that the plant is nearly ready for harvest. The plant will stop producing new leaves and focus entirely on bud production.
Plant Care
– Flushing: About 10-14 days before harvest, you’ll want to start flushing your plant. This involves giving it plain water with no nutrients to help remove any excess salts and chemicals. Flushing ensures a cleaner, smoother smoke.
– Light: Keep the light schedule consistent until the final week. Some growers reduce the light period to 12 hours per day in the last week to encourage ripening.
– Humidity: Lower the humidity to around 30-40% to prevent any mold from forming in the dense buds.
– Watering: Water less frequently in the final days before harvest to help the plant use up its remaining nutrients.
Nutrient Needs
Stop feeding nutrients during the final flush. This helps ensure that your buds are free from excess salts or chemicals, which can affect the taste and quality of the final product.
Watch Out For
– Trichome Color: Monitor the trichomes carefully. When they are mostly cloudy with a few turning amber, the plant is at peak potency and ready for harvest. If you wait too long, the THC will degrade, and the effect will become more sedative.
Common Mistakes to Avoid
– Avoid Overfeeding in the Final Weeks: Once you begin flushing, stop all nutrient feeding. This will ensure the plant uses up all its stored nutrients, resulting in a better-quality harvest.
– Don’t Rush the Harvest: While it’s tempting to harvest early, waiting until the trichomes are at the right stage will result in more potent, better-tasting buds.
Week 9-10: Harvest and Post-Harvest
After 8 to 9 weeks, your autoflowering cannabis plant should be ready for harvest. Before proceeding, check the trichomes—those tiny, crystal-like glands on the buds. To do this, use a magnifying glass or a jeweler’s loupe to examine them closely. When most trichomes have turned from clear to cloudy, with some amber trichomes present, it indicates that the plant is at its peak potency and ready for harvest.
Once you’ve determined that the plant is ready, use sharp scissors to carefully cut the branches. Hang them upside down in a cool, dark place with good airflow to dry. This proper drying and curing process will significantly enhance the flavor and potency of your buds, ensuring you enjoy the best possible experience from your hard work.
Check out our blog on Harvesting Cannabis for more in depth information
Following this step-by-step guide will help ensure that you get the best possible results from your autoflowering cannabis plants.
FAQs About How to Grow Autoflowers
What is the best light cycle for autoflowers?
Autoflowers can thrive under various light cycles, but the most commonly recommended light schedule is 18 hours of light and 6 hours of darkness per day (18/6). Some growers also use a 20/4 or even a 24/0 cycle, where the plant receives light for the entire 24-hour period. While autoflowering cannabis plants don’t rely on changes in light cycles to flower, providing more light can help increase yields.
How long does an autoflower take to grow?
The entire life cycle of an autoflowering cannabis plant from seed to harvest, typically takes 8-10 weeks. Some strains may take longer, up to 12 weeks, but most autoflowers are prized for their quick turnaround times. This makes them an excellent option for growers who want a fast harvest.
What does an autoflower look like when it starts to flower?
When an autoflowering cannabis plant starts to flower, you’ll notice the formation of white pistils at the nodes (where the leaves meet the stem). These tiny hairs indicate the plant is entering the flowering stage. The plant will also stop growing in height as it begins to focus its energy on bud production.
What week do autoflowers start to stretch?
Autoflowers typically start to stretch around week 3 or 4, just as they transition into the flowering stage. The stretch usually lasts for 1-2 weeks, during which the plant may double in size. After this period, the plant will shift its energy from vertical growth to developing buds.
What are the first signs of flowering?
The first signs of flowering in autoflowers are the appearance of white pistils. These hair-like structures will emerge at the nodes of the plant and will eventually develop into buds. Along with the pistils, you may also notice the plant beginning to stretch, signaling the transition from vegetative growth to flowering.
How long is an autoflower in the seedling stage?
The seedling stage of an autoflower typically lasts for about 1-2 weeks. During this time, the plant develops its first set of true leaves and establishes a small root system. After this stage, the plant will transition into the vegetative phase.
Conclusion
Autoflowering cannabis plants offer a streamlined, beginner-friendly approach to growing cannabis, with fast growth cycles, compact size, and resilience. Whether you’re growing indoors or outdoors, following a week-by-week guide on how to grow autoflowers will ensure you maximize your yields and enjoy a bountiful harvest in as little as 8-10 weeks. By paying close attention to the plant’s needs at each stage—from germination to flowering—you can grow healthy, high-yielding autoflowering cannabis plants with ease.
With the right care, proper light, and nutrient management, growing autoflowers can be a rewarding experience for growers of all skill levels. Happy growing!
Check out our range of high-quality autoflowering seeds


